Connect Autodesk Construction Cloud
If your drawings live in Autodesk Construction Cloud, import them without ever downloading a file. Link an ACC Docs folder to a Structured AI project: the set comes in with its folder structure, new versions are picked up as your team publishes them, and findings go back to ACC as native Issues.
Use case: point Structured AI at your project's "For Review" folder in ACC Docs, run your QA/QC checks, and send the flagged findings back to the team as ACC Issues they resolve in Build.
Before anyone can connect, an ACC account admin must authorize Structured AI for your company's ACC account - a one-time step that takes about two minutes. If that hasn't happened yet, start with Part 2: IT setup. Until it's done, you can still connect your Autodesk account, but the ACC picker shows Waiting for ACC to show your hubs instead of your hubs.
Part 1: Using the connector
Once your admin has authorized the app (Part 2), this is the everyday flow.
Connect your Autodesk account (once per user)
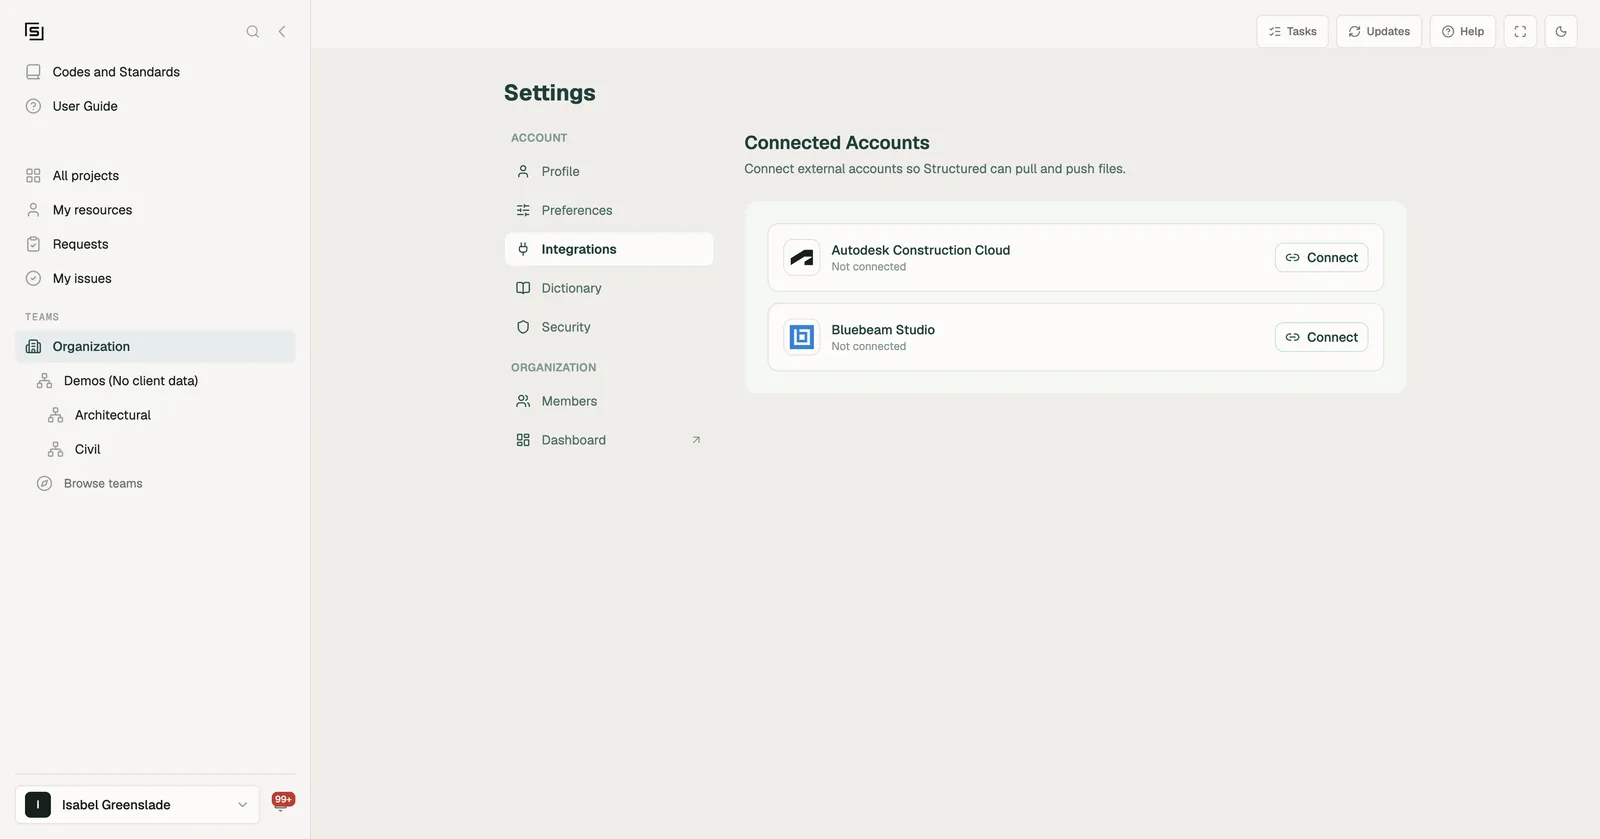
- Open the account menu at the bottom of the left rail, choose Profile & settings, then Integrations.
- On the Autodesk Construction Cloud row, click Connect.
- Sign in with your Autodesk account and accept the permissions.
Structured AI acts with your ACC permissions: you only see hubs and projects you're a member of, and importing a project's files requires view + download permission in its Document Management.
Import drawings from ACC
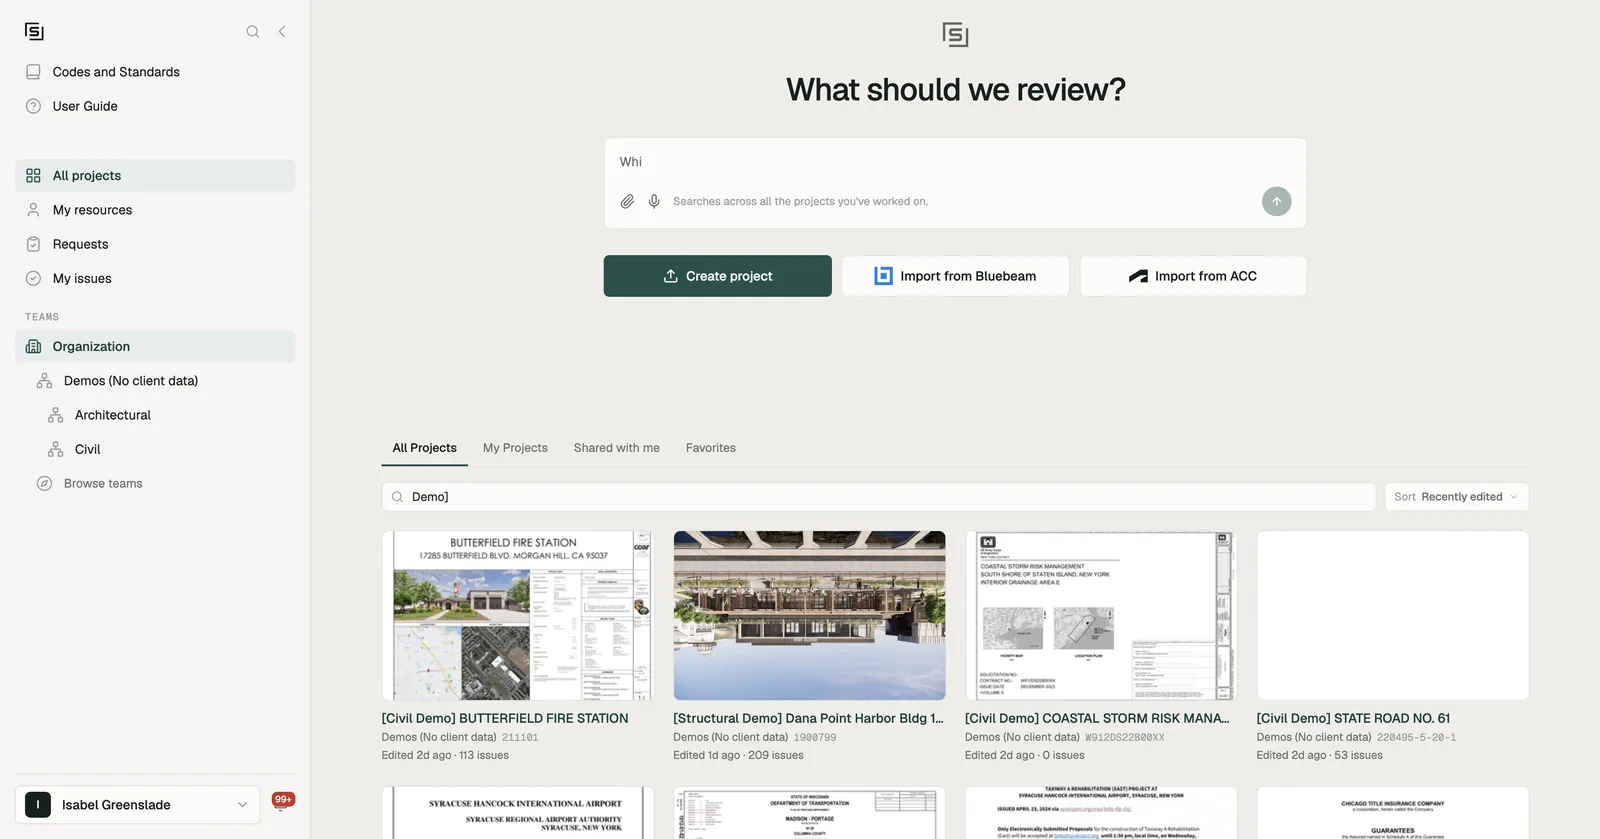
- Go to All projects in the left rail and click Import from ACC, next to Create project and Import from Bluebeam.
- Pick your Hub and Project, then open folders to find what you want. Tick individual folders or files, or tick nothing to import everything in the open folder. Tick Include subfolders to go deeper.
- Name the project and click Create & import. Structured AI imports the drawings and starts extraction, the same as a direct upload. A banner shows the import progress.
To link an existing project instead, open the project, click the settings gear, and choose Link to ACC under Autodesk Forma / Construction Cloud. Project owners and editors can do this once their Autodesk account is connected.
Any file type in the folder comes across, not only PDFs.
The ACC import dialog with a hub, a project and a folder open, and a few rows ticked
Keep the set in sync
The link remembers where the set came from. When files change in ACC - new versions published, sheets added, renamed, or moved - pull the changes in from the ACC sync menu on the project (the refresh icon with the ACC logo):
- Get latest from ACC brings in new and changed files, applies renames and moves, and imports your ACC issues.
- Publish findings to ACC… sends findings the other way (see below).
- Sync both ways… gets the latest, then opens the publish step.
ACC issues come in as comments in the project's Issues table, next to everything else. Issues closed in ACC arrive as resolved.
Unlinking the project from ACC keeps every imported document in place.
The ACC sync menu on a linked project, showing Get latest from ACC, Publish findings to ACC and Sync both ways
Publish findings as ACC Issues
Push flagged issues from Structured AI back to the linked ACC project as native ACC Issues, so the team triages and resolves them in Build alongside everything else - no Structured AI account needed to work the punch list.
Choose Publish findings to ACC… from the ACC sync menu. The dialog shows how many findings will go across, and offers three options:
- Also upload a findings report PDF - adds one QA/QC findings report to the linked ACC folder. Publishing again adds a new version of the same report.
- Re-export findings already pushed - creates a fresh ACC issue for every finding, including ones sent before. Leave it off unless an earlier export needs replacing.
- Also upload files added here to ACC - sends files you uploaded straight to Structured AI into the linked ACC folder, so later syncs keep them.
Findings already pushed are skipped, unless their ACC issue was deleted, so publishing again sends only new and missing ones. Project owners and editors can publish.
Publishing runs under the Autodesk connection of the person who linked the ACC folder, so that account needs permission to create issues in the ACC project. The ACC project also needs at least one active issue type with an active subtype.
The Publish to ACC dialog with the findings count and its three options
Disconnecting
Profile & settings → Integrations → Disconnect removes your stored Autodesk connection. (To revoke access for the whole company, see Part 2.)
Part 2: IT setup (authorize Structured AI)
This is the step that must happen before anyone in Part 1 can connect. It's done once per company, by an ACC hub admin (called account admin in older ACC accounts - not project admin), and takes about two minutes. Individual Structured AI users don't need any special ACC role.
-
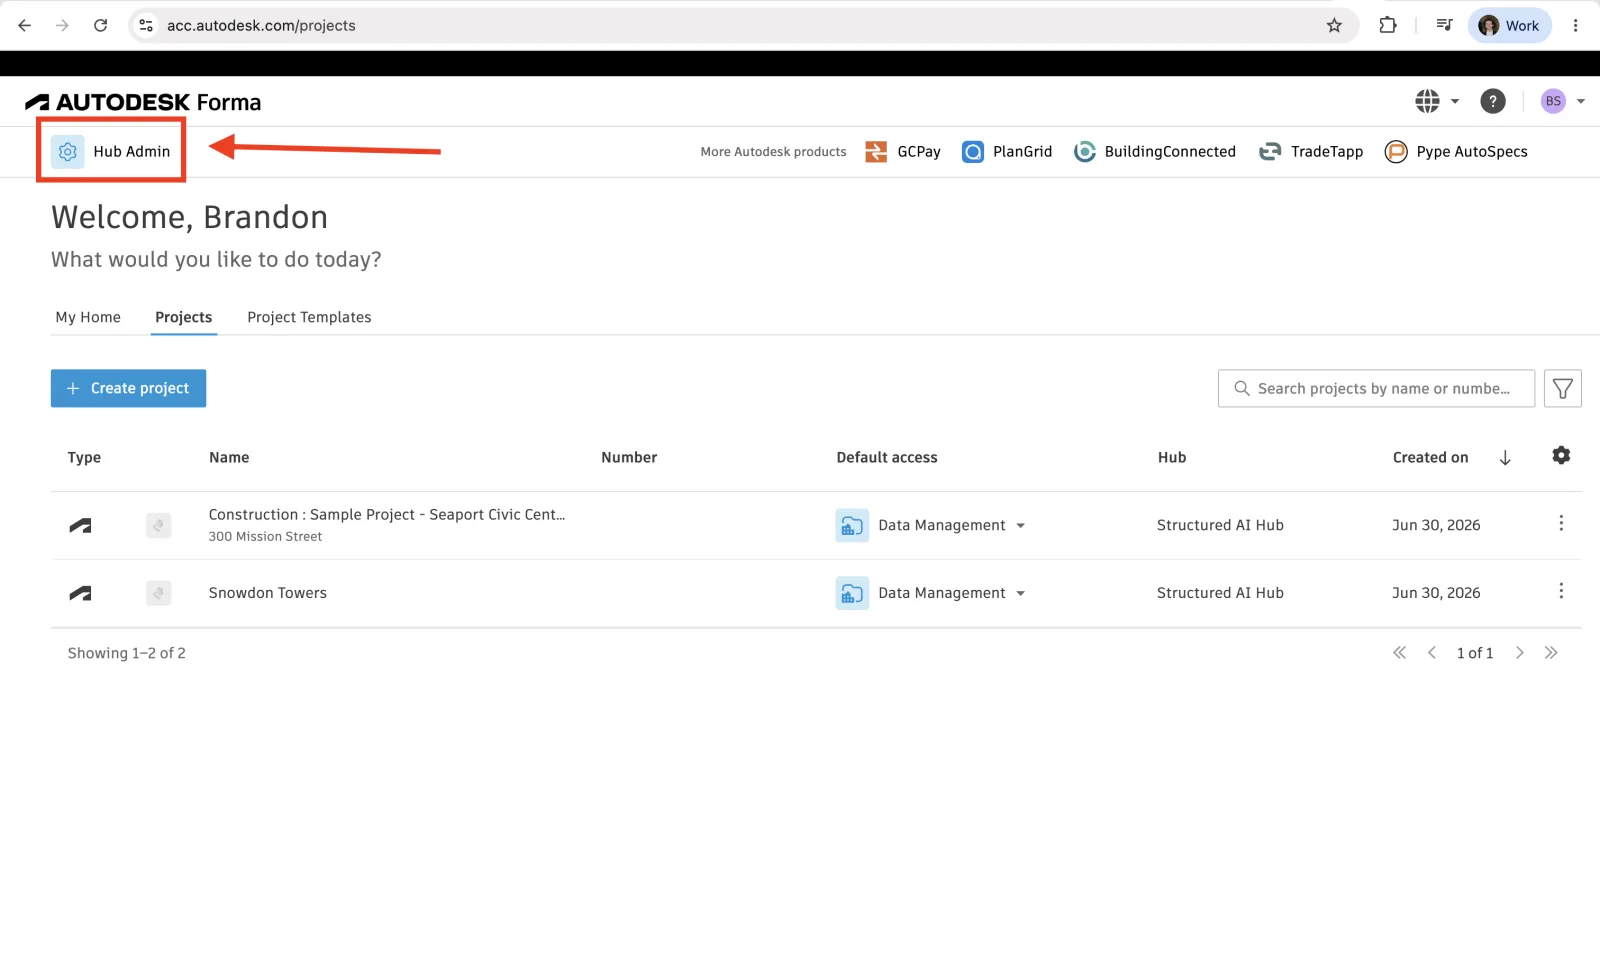
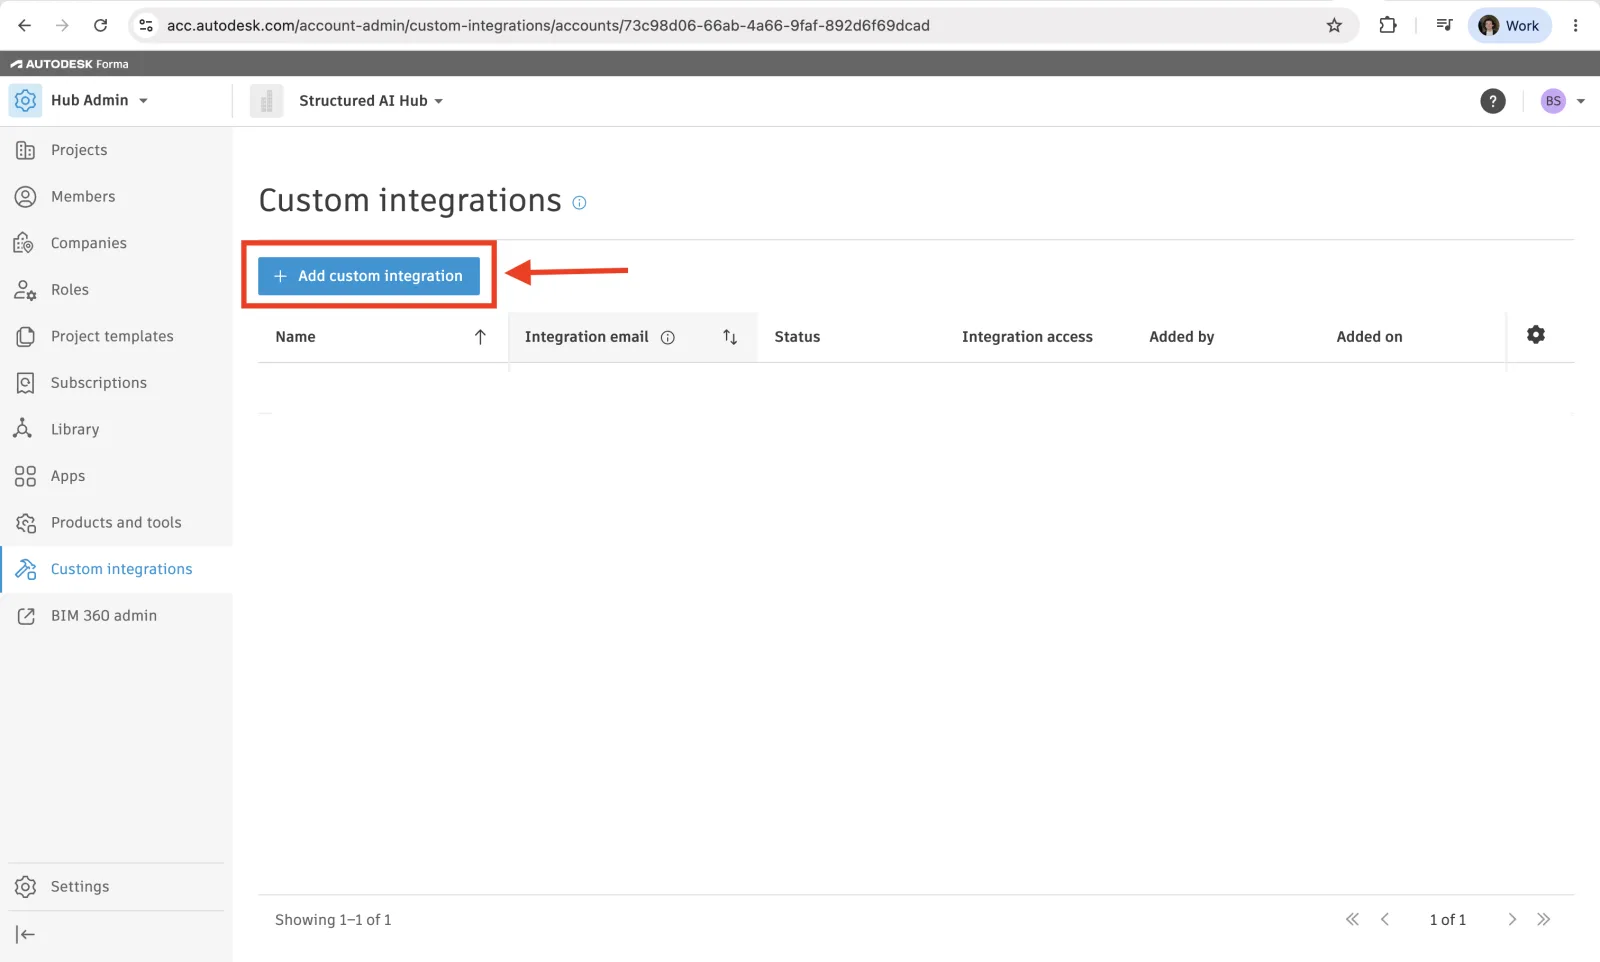
Go to acc.autodesk.com/projects and open Hub Admin.
-
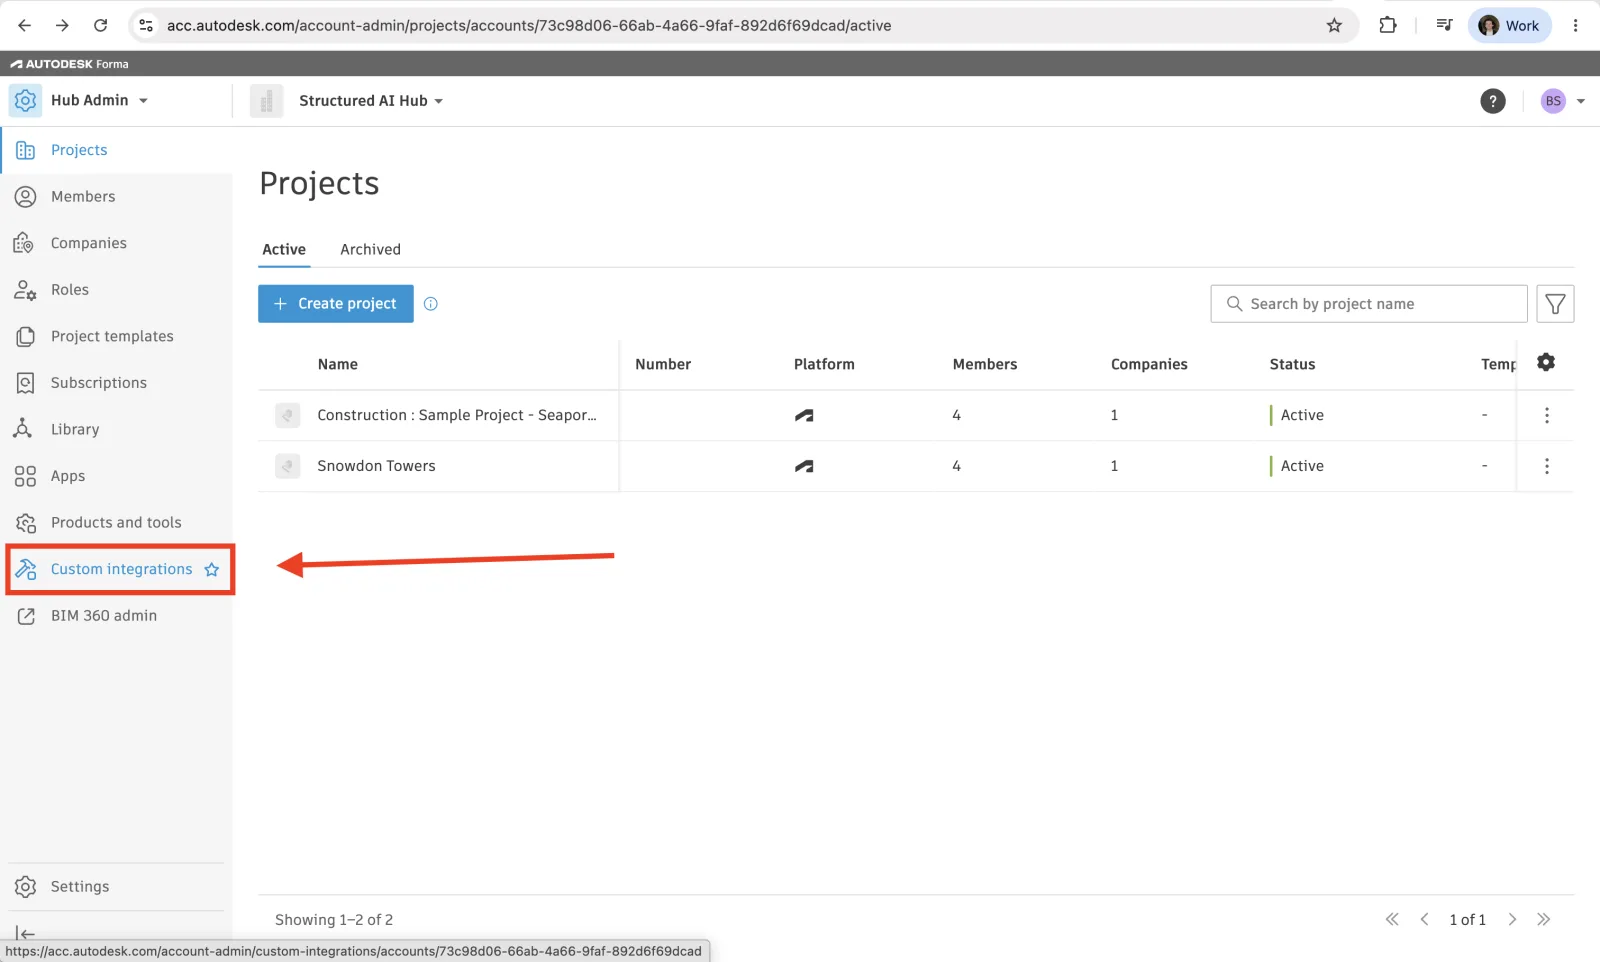
In the left sidebar, click Custom integrations.
-
Click Add custom integration.
-
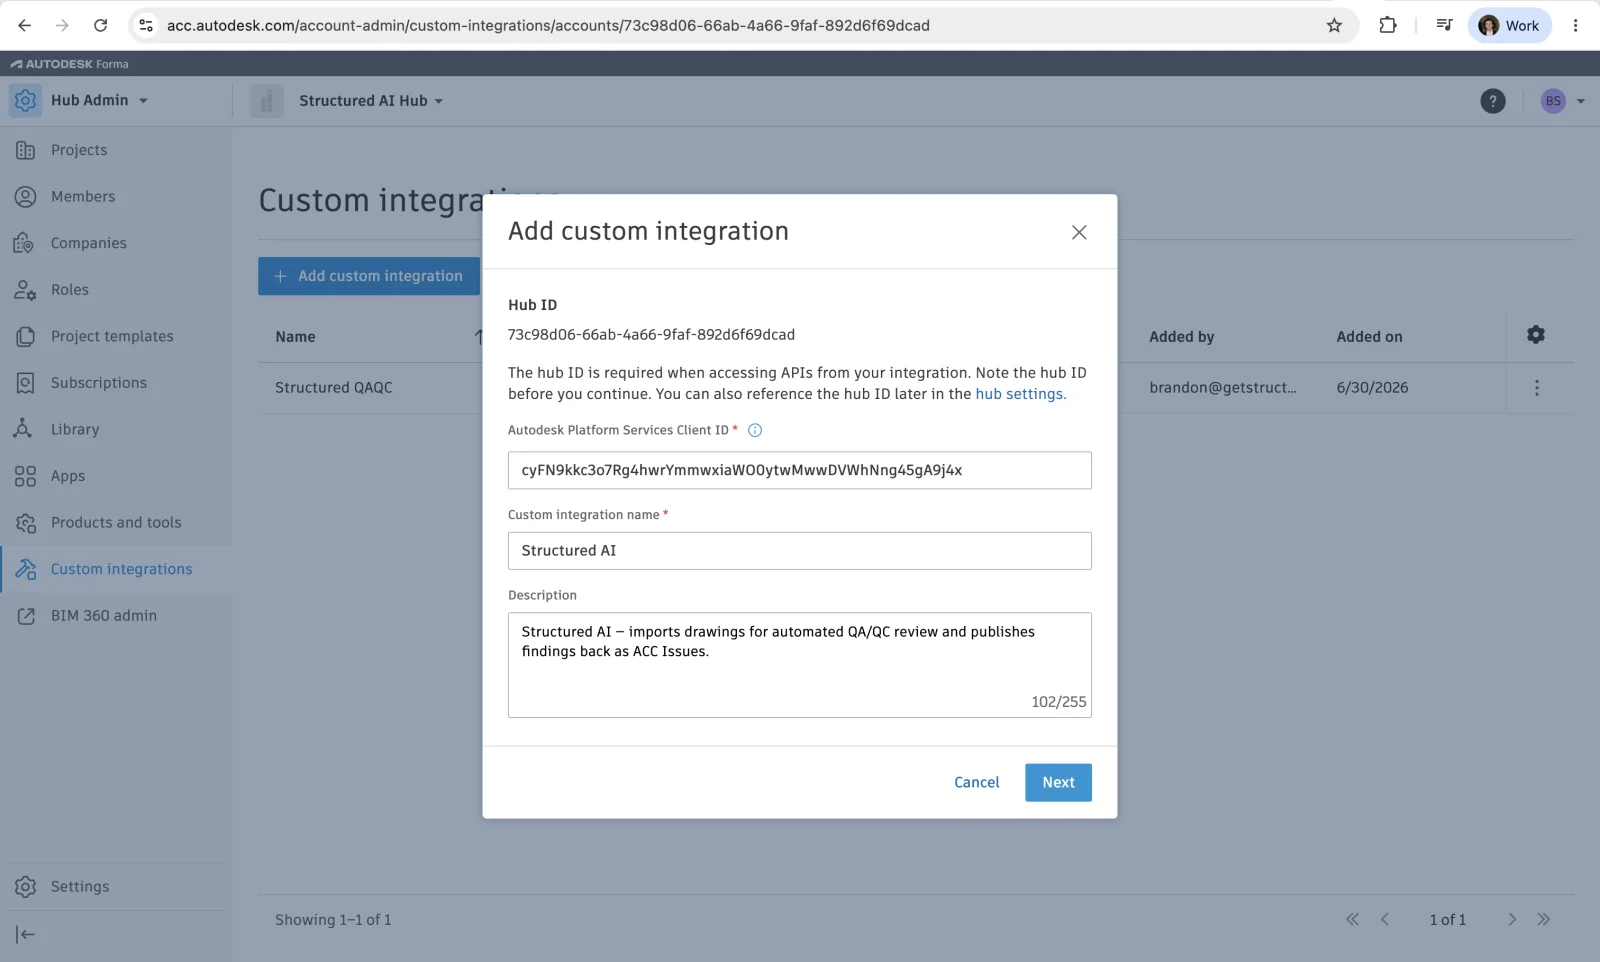
Fill in the dialog:
-
Autodesk Platform Services Client ID:
cyFN9kkc3o7Rg4hwrYmmwxiaWO0ytwMwwDVWhNng45gA9j4x -
Custom integration name:
Structured AI -
Description (optional):
Structured AI - imports drawings for automated QA/QC review and publishes findings back as ACC Issues.
-
-
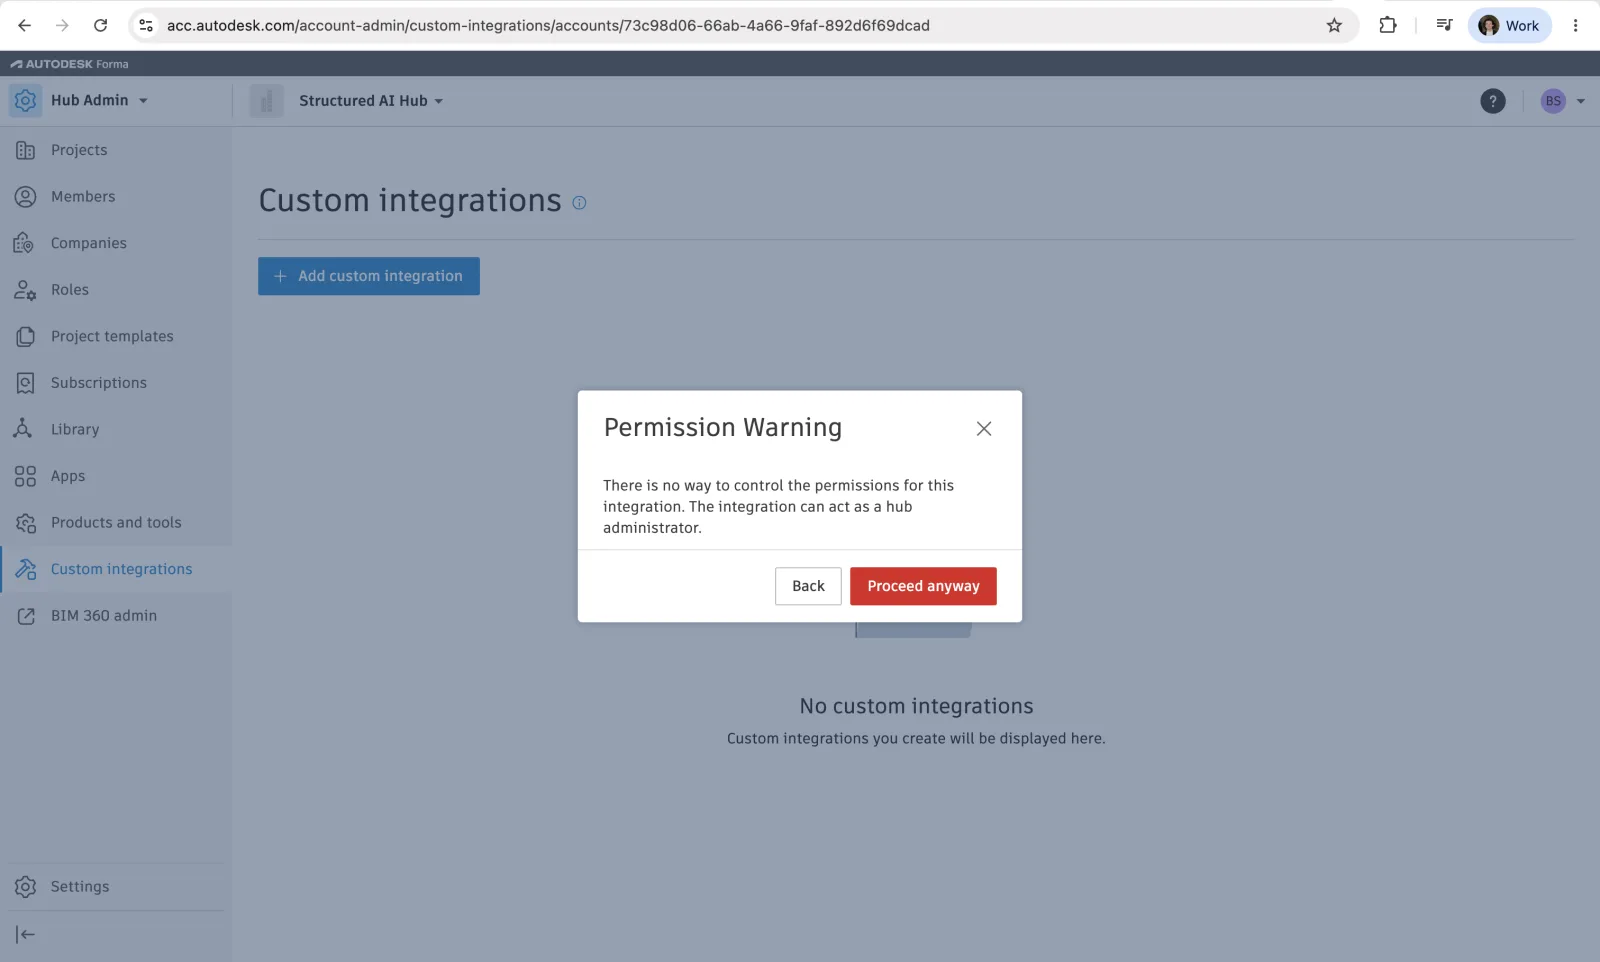
Click Next. ACC shows a permission warning - this is Autodesk's standard notice for every custom integration. Click Proceed anyway.
-
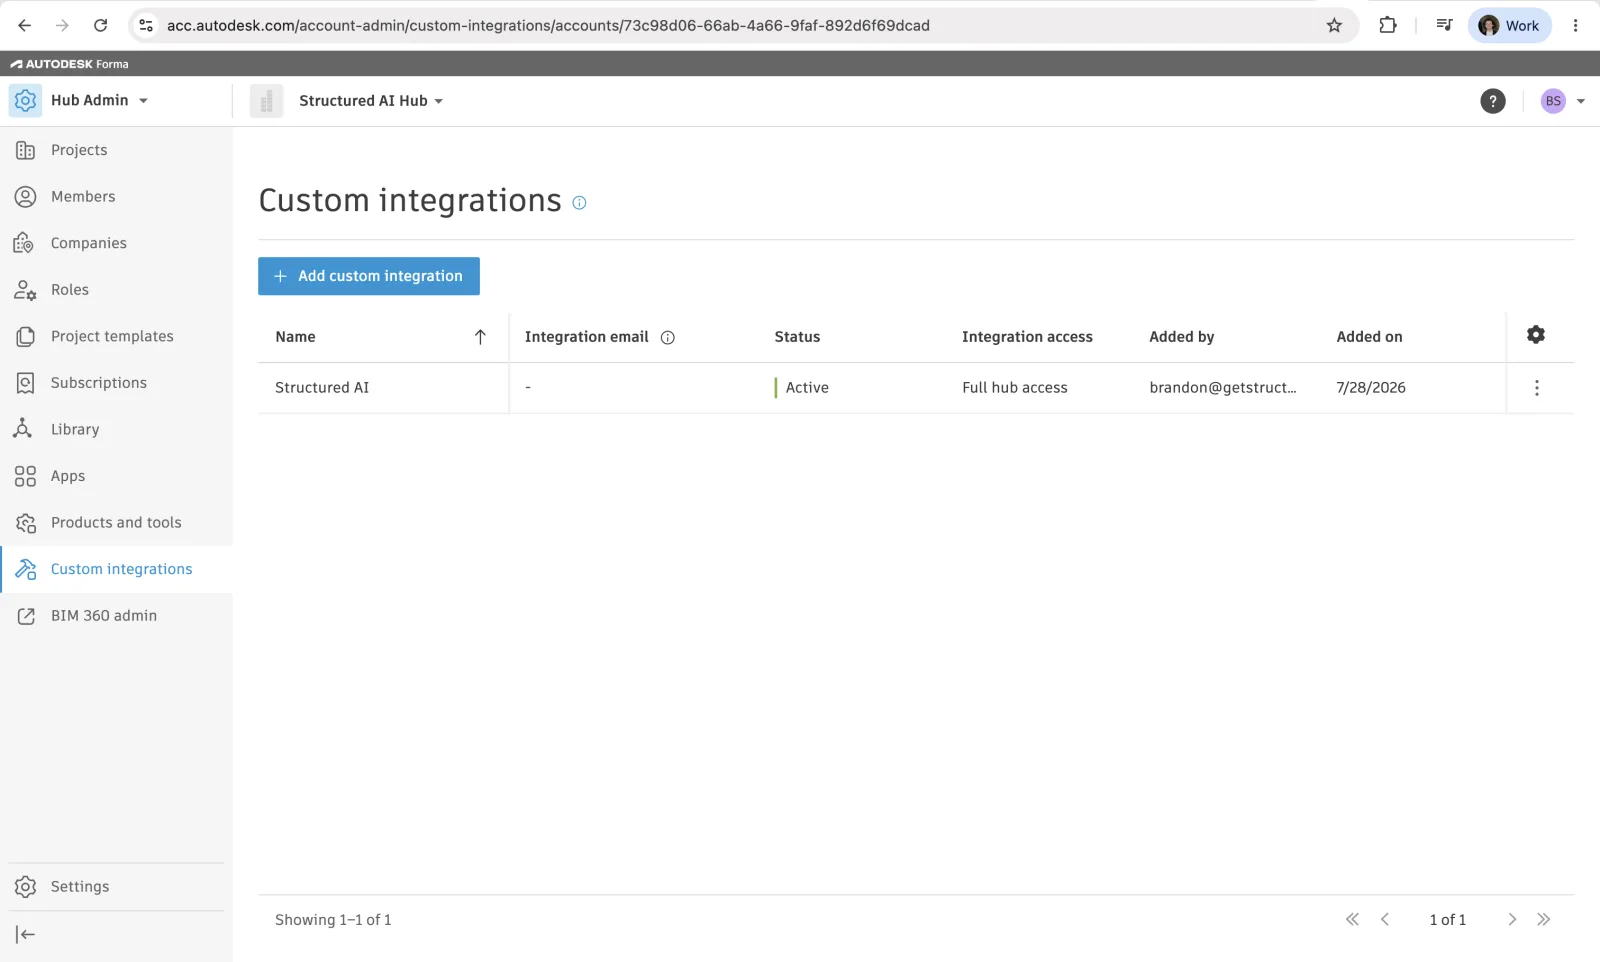
That's it - Structured AI now appears in the list as Active.
Authorization can take a few minutes to propagate on Autodesk's side. The import dialog keeps checking by itself for about 10 minutes, then offers Check again now. If a user beat you to it, the screen they're looking at shows this same Client ID, with Copy Client ID and Copy instructions for your admin buttons so they can send it to you.
The Waiting for ACC to show your hubs screen, with the Client ID and the copy buttons
Revoking access: deleting the custom integration under Hub Admin → Custom integrations revokes access for the whole account. Individual users can also disconnect just themselves (see Disconnecting).
Troubleshooting
- "Waiting for ACC to show your hubs" - most often you aren't a member of any ACC project yet. ACC hides every hub until you are, even from hub admins, so ask a project admin to add you and accept the invite email. Otherwise Part 2 hasn't been completed for your account, or hasn't finished propagating. The screen rechecks for about 10 minutes; after that, click Check again now.
- A hub or project is missing from the picker - you must be a member of that ACC project, with view + download permission on its files.
- Your Autodesk connection expired - the picker offers Reconnect. Sign in again and retry.
- Publish fails with "no active issue subtype" - the ACC project needs an active subtype under an active issue type configured in Build.
- Publish fails with a permission error even though you can create issues - publishing uses the connection of whoever linked the ACC folder; that account needs issue-create permission in the ACC project.
If Import from ACC shows a padlock, the connector hasn't been turned on for your organization yet. Talk to us.